I am pleased to show to you a tutorial on how to create realistic wounds. I was browsing through my Instagram account when I saw a photo of a wound that looked SO real that I cringed and felt my knees buckle! Turns out it was a fake wound effect that a cosplayer created. I immediately contacted the cosplayer to ask for a tutorial / feature on it, and she has graciously sent me this info.
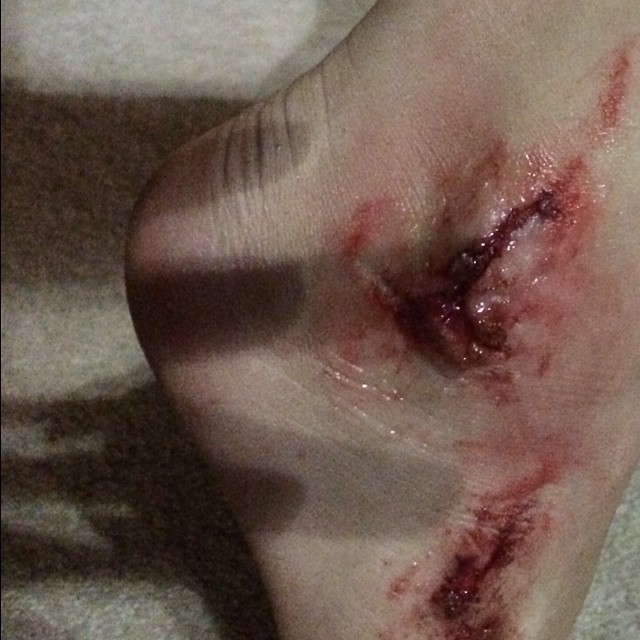
Do visit, follow, and support the cosplayer, Sailor Strawberry! Check her Instagram account here – @sailor.strawberry and prepare to see the finished look below!

From Sailor.Strawberry:
For this type of SFX makeup, I used flour, vaseline and a red washable marker.
To start off, I mixed some flour and vaseline together to create a paste-like blend. I only made as much as I needed to use, as I had no way of storing it.
After this, using a hard, plastic spatula, I spread the paste all over areas where I wanted to make my cuts/scrapes.
After smoothening it out, I broke the surface up, and made it look ragged. If you want to make a cut that looks deeper, don’t be afraid to smoothen more mix over the area, and break it up so that it seems jagged, almost like a piece of flesh has been half- ripped off.
After preparing the area, I broke a red, washable marker, put on some plastic gloves, and squeezed the ink onto the fake “cuts” and made sure to add more wherever it was deeper, to give it a blacker look.
Using my plastic gloves, I then bunched up the tips of the fingers (while still wearing them), dipped one in ink and dotted it around the cuts, to make it seem like blood splatters.
Once everything was finished, I used plain vaseline, and went over everything very gently, to give it a wet look, and to make it seem as though it was still bleeding.
I hope this mini-tutorial helped!!
~SS
And voila, here is the end result! Awesomely gruesome, right?


